Discover one of the most fascinating geological features in the country! Below is my guide to plan your Putangirua Pinnacles Walk in New Zealand North Island. I am sharing details of my experience to help you decide which path to take and get ready for the hike with photos and a video.
Why do the Putangirua Pinnacles Walk?
The Putangirua Pinnacles are one of the most fascinating geological formations in New Zealand North Island.
It is one of the best examples of badlands erosion in the country. It allows you to travel back in time in Earth history.
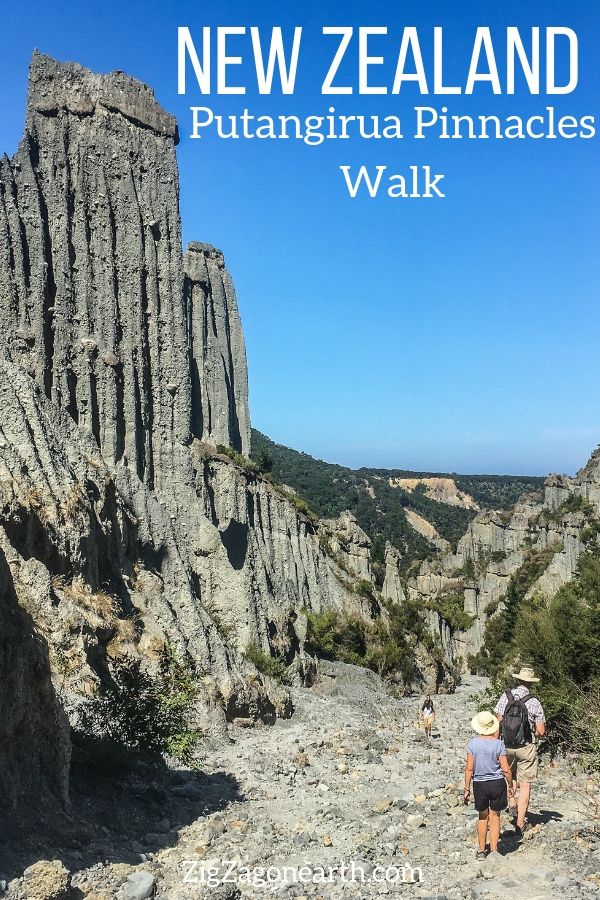
And you are able to walk in the middle of those giant earth pillars! Their color is quite boring, as it is mostly grey, but their sheer size and the quantity are really impressive.
Plus the loop allows you the see them from the base or from a lookout at the top!

Pinnacles walk in video
Below is a short video to show you what it looks like to complete the loop anticlockwise (river bed first, then up to the lookout):
Putangirua Pinnacles and Lord of the Rings
This unique place was used as a filming location for the Lord of the Rings Trilogy.
It appears in the third movie, Return of the King. It is the Dimholt Road that Aragorn, Legolas and Gimli took on the way to the Paths of the Dead.
Planning tips – Putangirua Pinnacles New Zealand
Location of the Putangirua Pinnacles Wairapapa?
- South coast of North Island, east of Wellington – in the Wairapapa region
- South of Martinborough – Turn at Lake Ferry
- Martinborough to Putangirua carpark = 45min drive
- Wellington to Putangirua carpark = 1h40 drive
- Cape palliser to Putangirua carpark = 30min drive
- You can find the pinnacles in my ebooks, with GPS coordinates and practical maps to simplify the planning of your NZ road trip:
Plan your dream trip to New Zealand with my guides!

- 12 easy-to-plan maps
- 200+ pre-selected locations
- GPS coordinates
- Useful planning tips
- 285+ large photos
- 6 easy-to-plan maps
- 90+ pre-selected locations
- GPS coordinates
- Useful planning tips
- 150+ large photos
How to get to the Putangirua Pinnacles Martinborough?
- There are no public transportation to get to the Pinnacles – it is off the beaten path
- You need a rental car
- or you could hitchhike from Martinborough (which can be reached by bus)
- And I have not found any group tours visiting this region.
Need to rent a car in New Zealand?
My tips:
- Compare prices on my favorite platform: Discovercars.com – one of the best rated comparison sites!
- Prefer a car with enough power for the mountain areas
- Consider their full coverage option – it for peace of mind!
- Book early to have a large choice of vehicles!
- See all my tips to choose and book your car


Walking to the pinnacles
- Last 350m of road are gravel
- Large carpark near the campsite
- Toilets at the carpark but none on the walk
- I recommend walking poles as the riverbed can be difficult on your ankles
- The riverbed walk has hardly any shade. Bring a lot of water and cover yourself
- Plan 3 hours to complete the loop – or 2 hours return for the riverbed walk (I am a slow walker)
- Between the path at the bottom and the path at the top, the ascent took 25min with slopes and stairs
- It is part of the Te Kopi loop track – a longer loop starting and finishing in Te Kopi by the coast. It goes higher up on a path with beautiful views of the water. And a glimpse of the pinnacles from above – this would take you 4h
- Ask locals what they think of the conditions: if it has been pouring rain before, the walk can be dangerous
Accommodations near the pinnacles of Martinborough
- Right by the pinnacles, all you can find is a Department of conservation campsite with minimal facilities
- You can find a few accommodations in Ngawi, a small settlement on the way to cape Palliser – See options
- Otherwise you can find a lot of great places to stay in Martinborough surrounded by vineyards. It is a beautiful, relaxed little town – Check out the best rated accommodations
- I personally stayed at the Martinborough Experience B&B – the owner was charming and the decor was too – it is another one of my favorite stays in New Zealand – check out more photos and availability

Putangirua Pinnacles Scenic Reserve – Map and Hiking Difficulty
Let me show you, step by step, what to expect on this walk, so you can decide if you can do it or not.
Best time of the the Putangirua Pinnacles walk
2 things to keep in mind to decide when to do the walk:
- There is no shade so you should do early morning or late afternoon
- The pinnacles face West. For better light from the lookout, complete it late afternoon. I did it in the morning and had the sun in my face…
Putangirua Pinnacles carpark
Below is a picture of the carpark. It is quite large but fills up pretty quickly.
It is well indicated from the road.

Putangirua Pinnacles walk – Map
Below is the map you can see at the beginning of the walk. It shows the limit of the Putangirua scenic reserve.
In red is the walk along the river bed. But it actually does not show all the paths as you can do a loop.

Orientation and difficulty on the hiking paths
I did a lot of research before doing the hike to decide if I could do it. So I thought I would share my experience with you.
- First of all, I was worries I would be alone because it is off the beaten paths but quite a lot of people do the detour. So I felt relieved to know other people would be around if needed
- At some of the crossroads you can see signs indicating either the ridge track or the Stream bed track
- On the Ridge track, no way to get lost, the path is clear and technically not difficult (but it goes up an down)
- The slope of the Stream bed is gradual (so easier) but sometimes you are wondering where is the best place to walk. Try looking for the orange poles as much as possible and at the end go straight, don’t turn inside an arm of the river bed.
- Technically the river bed is very rocky, especially at the end. If you do not have strong ankles, I recommend bringing walking poles.
- Ask locals what they think of the conditions, if it has been pouring rain before…


Which way to walk to the Pinnacles
I recommend going up via the Stream Bed and down via the ridge track (anticlockwise). Why?
- Cons – you will have to climb up during 25min with a mix of staircase and slope – that is the only drawback in my opinion
- Pros – you walk the section that requires the most focus at the beginning before you are tired. This means less risk of injury
- Pros – if you are tired you can just walk back via the stream bed and not go up to the lookout. It is definitively more impressive from the bottom!

How long to walk the Putangirua pinnacles loop?
It took me a total of 3h to complete it and I am not fit.
- 40min from the carpark to seeing the first pinnacles
- 10min to walk further in and explore
- 5min to go back to the where you can take a shortcut to the lookout
- 25min to climb to the lookout (steep slopes + steps) – but in the shade yeahhh!
- 1h to slowly walk back to the carpark via the ridge track
- If you want more, from the lookout you can keep walking up and walk back to the coast and Te Kopi.
Is it worth it?
I did enjoy it a lot. The size was quite impressive.
But I must admit that I have preferred the Omarama clay cliffs in South Island because they were colorful.
I might have enjoyed it even more in late afternoon with a better light.
Putangirua Pinnacles Track through Stream bed in photos
Below are pictures of the first section of the walk in the stream bed.
As you can see you walk on a mix of gravel and rocks. Sometimes the view is wide, sometimes narrower.
And there is no shade!

Sometimes the track takes you to the side of the valley and you get a little reprieve from the sun, but it does not last for long…

I must admit that those 40min until the first pinnacles felt quite long. The sun is harsh in New Zealand. But then you start getting glimpses of what there is to come.

That’s when the stream bed narrows and the slope increase…

I don’t drink coffee 

But I also like other drinks and sweets!
Do you like the free content you find on my blog? All my tips and practical information, without intrusive advertising…

Putangirua Pinnacles in photos
And here they are. You start seeing the giant hoodos on the side of the river bed. And you enter the magical land…
Below are some picture to show you what you could see.


Geology of the Putangirua Pinnacles
Wandering how those pinnacles came to be? Here is an overview of the geological phenomenon behind their creation:
- 7 to 9 million years ago, the Aorangi Range was an island, as sea levels where much higher
- Elements eroded the mountains and gravel washed down to the coast. They formed a sedimentary layer.
- After that the sea level rose again and the island as underwater
- But for 120,000 years the sea has receded and the land has been exposed by the Putangirua stream
- Erosion happened and conglomerates were washed away. But in some places they stayed together protected by other rocks. This created the pinnacles also known as a ‘collection of hoodoos’.
- Erosion has increased in the last 1000 years and they are eroding at a rate of 1cm per year according to the Encyclopedia of New Zealand

Climb to the Putangirua Pinnacles lookout
After you have explored the fascinating formations. You walk back down the smaller section of the river bed and come to a crossing.
You have 2 options:
- Walk back to the carpark via the stream bed
- Walk up to the the Pinnacles Lookout (and if you keep going to the Te Kopi loop track)

The climb is under the trees. It is a mix of steep slopes and staircases.

At each turn, I was hoping it was the end, but it kept going up…
And then finally I saw the Saint Graal! The viewing platform 🙂

This is a great location above the pinnacles. You can see the giants and how they are eroded from the land.
Sadly I was there around lunch time, so the worse time for the light…
Below is the view of the Putangirua pinnacles from the lookout platform:

Finishing the Putangirua Pinnacles Loop – Ridge track
I was too tired to keep going to the Te Kopi loop track. So I walked back via the ridge track.
It goes up and down and up and down. But technically it is a lot easier as it is a dirt track.
However it may be slippery after rain.

From time to time you can see the water!

And then you enter the forest before getting back to the river bed. Once at the river bed you still have 10 to 15min of walking to reach the carpark.

Driving to Cape Palliser
If you have been all the way to Putangirua, keep driving!!!
There drive the Cape Palliser is absolutely stunning and worth the extra kilometers 🙂 See my article
First the cliffs are white…

And then you have beautiful hills on one side and the ocean on the other.

As you approach Cape Palliser you can see charming black sand beaches with turquoise waters… Stop by the rocks as you may see some seals!

And the view from the lighthouse is stunning. Check it out in my article about Cape Palliser!
South Island alternative – Omarama Clay Cliffs
If you enjoy pinnacles, consider also the Omarama clay cliffs in South Island.
They are not as tall but they are colorful and way easier to access (more gravel road but only 10min of walking).
Check out my article

Want to see more of NEW ZEALAND?
PREVIOUS:
NEXT:
Cape Palliser (Lighthouse and seals)


